Please Wait

Loading..

Security

Protect your application with TLS/SSL, AES and Token Based Authentication

Protect your application with Yalgaar

1. Connect To YALGAAR with SSL

The first step is to sign up to Yalgaar using our get started form. You can get in your dashboard in under few seconds. In your dashboard there is a demo app created, click on it and go to App Information page. You can see your client key. To connect to a Yalgaar use your client key with SSL "true".


<!-- Include the Yalgaar Library -->
<script src="yalgaar.js" type="text/javascript"> </script>

<!-- Connect to Yalgaar with your client key --> <script type="text/javascript"> ConnectToYalgaar({ ClientKey: 'YourClientKey', SSL: true, Callback: function (acknowledgement) { }, Error: function (err) { } }); </script>

//Required .Net Framework 4.5 or above

//Using Yalgaar library using YalgaarNet;
//Connect to Yalgaar with your client key YalgaarClient yalgaar = new YalgaarClient("YourClientKey", true, ConnectionCallback);
//Create object of Yalgaar client with context of application
YalgaarApiClient objYalgaarClient = new YalgaarApiClient.Builder(context).build();
                            
//Connect to a Yalgaar client with your client key yalgaar.connect("YourClientKey", true, ConnectionCallback);

//iOS device with version 7.1 or above. 

//create an object of YalgaarClient class. YalgaarClient *objYalgaarClient = [[YalgaarClient alloc] init];
//Connect to Yalgaar with your client key [objYalgaarClient connectWithClientKey:@"YourClientKey" IsSecure: YES Error:&error]; //called when connection done successfully (void) didConnected{ }

For more languages, 
check out Yalgaar SDK & Documentation page
SDK & Documentation


<!-- Include the Yalgaar Library -->
<script src="yalgaar.js" type="text/javascript"> </script>

<!-- Connect to Yalgaar with your client key --> <script type="text/javascript"> ConnectToYalgaar({ ClientKey: 'YourClientKey', SSL: false, AESSecretKey: 'SecretKey', AESType: 128, Callback: function (acknowledgement) { }, Error: function (err) { } }); </script>

//Required .Net Framework 4.5 or above

//Using Yalgaar library using YalgaarNet;
//Connect to Yalgaar with your client key YalgaarClient yalgaar = new YalgaarClient("YourClientKey", false, "SecretKey", 128, ConnectionCallback);
//Create object of Yalgaar client with context of application
YalgaarApiClient objYalgaarClient = new YalgaarApiClient.Builder(context).build();

//Connect to a Yalgaar client with your client key yalgaar.connect("YourClientKey", false, "SecretKey", AESType.AES_128, ConnectionCallback);

//iOS device with version 7.1 or above. 

//create an object of YalgaarClient class. YalgaarClient *objYalgaarClient = [[YalgaarClient alloc] init];
//Connect to Yalgaar with your client key [objYalgaarClient connectWithClientKey:@"YourClientKey" IsSecure: YES AESSecretKey:@"SecretKey" AESKeyType:AESKeyType.AESKeyType128 Error:&error]; //called when connection done successfully (void) didConnected{ }

For more languages, 
check out Yalgaar SDK & Documentation page
SDK & Documentation
                                                          

2. Connect to Yalgaar with AES Encryption

The first step is to sign up to Yalgaar using our get started form. You can get in your dashboard in under few seconds. In your dashboard there is a demo app created, click on it and go to App Information page. You can see your client key. To connect to a Yalgaar use your client key with AESSecretKey and AESType (128, 192 or 256).


3. Connect To YALGAAR with Authorized Token

The first step is to get Authorized Token for your Yalgaar Client Key, In order to get token Log in to your dashboard. Click on any app, you will get your App dashboard and it will show Application add-ons. To get your Authorization Token Enable "Authentication Token" as shown in below.


Token Based Authentication

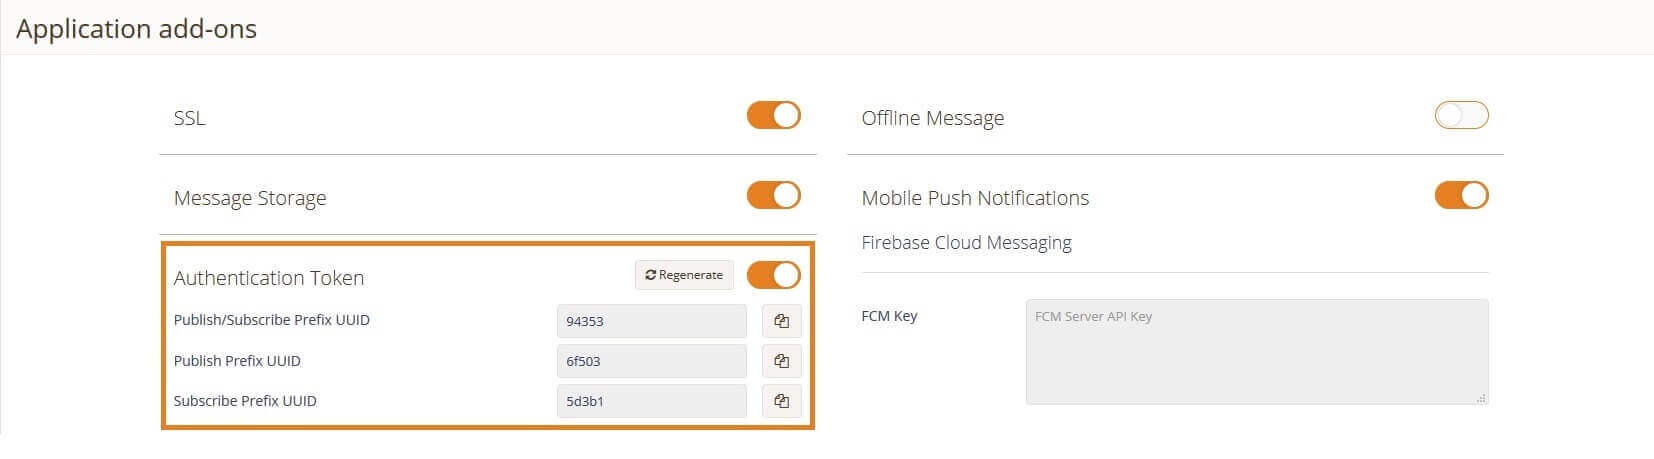
You can see three Tokens by enabling "Authentication Token":

  • Publish/Subscribe prefix UUID: Connection created with this prefix UUID has both publish and subscribe permission.

  • Publish prefix UUID: Connection created with this prefix UUID has only publish permission.

  • Subscribe prefix UUID: Connection created with this prefix UUID has only subscribe permission


<!-- Include the Yalgaar Library -->
<script src="yalgaar.js" type="text/javascript"> </script>

<!-- Connect to Yalgaar with your client key --> <script type="text/javascript"> ConnectToYalgaar({ ClientKey: 'YourClientKey', SSL: true, UUID: '94353-User1', Callback: function (acknowledgement) { }, Error: function (err) { } }); </script>

//Required .Net Framework 4.5 or above

//Using Yalgaar library using YalgaarNet;
//Connect to Yalgaar with your client key YalgaarClient yalgaar = new YalgaarClient("YourClientKey", true, "94353-User1", ConnectionCallback);
//Create object of Yalgaar client with context of application
YalgaarApiClient objYalgaarClient = new YalgaarApiClient.Builder(context).build();
                            
//Connect to a Yalgaar client with your client key yalgaar.connect("YourClientKey", true, "94353-User1", ConnectionCallback);

//iOS device with version 7.1 or above. 

//create an object of YalgaarClient class. YalgaarClient *objYalgaarClient = [[YalgaarClient alloc] init];
//Connect to Yalgaar with your client key [objYalgaarClient connectWithClientKey:@"YourClientKey" IsSecure: YES WithUUID:@"94353-User1" Error:&error]; //called when connection done successfully (void) didConnected{ }

For more languages, 
check out Yalgaar SDK & Documentation page
SDK & Documentation
                                                          

In the Right hand side Example, created Yalgaar connection with Publish/Subscribe prefix UUID token "94353", so this connection has both publish and subscribe permission. it can do publish and subscribe.


4 .Javascript SDK Security

Protect your JavaScript connection at client side by enable "Javascript API Security" and adding "Authorized Domain" on your dashboard as shown in below.

Javascript Security

Try another tutorials